
No, I am not really, but you can imagine the fuss of finding the right thread shade to match your fabric.
When your threads are getting let say more than 10 in numbers, and it double because you also have bobbins of the same shade, you probably would consider an organised way to store them.
As for me, the clear divided box is a choice.
 ~ Lets have this in my wish list while I am finding a blacksmith that can fabricate one for me..
Part I : Original Hanger
So, I decided to give it a try to do one using wood.
These are all the tools needed :
 ~from left to right : Philip screwdriver (to substitute a driller), flat file, hammer, mini hacksaw, bamboo chop sticks, and a ready made wood from Daiso in the background. Not in pic: nails, picture clinchers and its nails fit to wood size for hanging purposes.
The steps :
1. Start with measuring the gap of each thread when placed upon the bamboo stick that act as a hanger. Marked it, you may have few variants considered you had 240m or 1000m threads.
2. Nailed a pair of picture clinchers with a nail that comes with the package to hang the organiser once completed. You may also omit this step if you just use a pair of double clip instead.
3. Measure and mark the chop stick using a mini hacksaw according to your number of thread holes. Exclude the hole for bobbins in which 18x3/4" or 1.2mmx19mm nails will substitute.
Smoothen the cut stick with the falt file for the outside and sharpen for the inside.
4. Using driller, or in my case a screw driver, drill holes to hold bamboo sticks. I just use a srewdriver because the wood is very soft.
5. Hammer the cut sticks to the holes. Strengthen with some nails. One nail to each stick only.
(My stick has cracked because its too thin to allow for the same nail use in (5).
6. For the bobbin row, maybe on the last row of wood, just hammer the nail in (2) with proper gap for each bobbin size.
7. Hang the wood to your desired wall, or back of the closet door like I did.
You may start to hang the threads to the sticks and bobbins to the nails.
 ~As in (3), prepare the cut sticks not to be too sharp for safety using file. But it has to be sharpened to be hammered to the drilled hole.
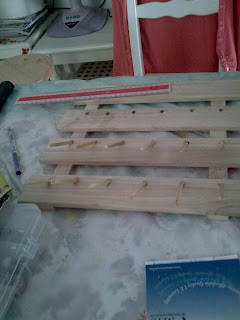 ~ a WIP
 ~A completed hanger, but I am not satisfied. Noticed the crack on the wood...
 ~after all the threads and bobbins have occupied the hanger
Part II : Modification to a New Hanger

So I made the other one replacing the chopsticks with single pin hooks that usually used to hang a pencil pleat curtain.
Remember to straighthen the curvy end of the pin using pliers.
The sharp side of the pin is already a great advantage that saves time and energy, so just hammer it to the wood.
 ~and at the end it look like this...better!
 ~I also extend some rollers to act as ribbons dispensers
 ~and my small closet is getting jamned with fabric hanger, thread hanger, and fabrics, and other tools.
wowwWWW..... cayalahhh... good idea... aku suke... tersangat laa suka.. aku pon teringin nak buat tuk riben aku yg bertimbun tu... emm tapi mane nak cari kayu camtu ekk.. ade ke kat sini.. emm..
ReplyDelete