
Thursday, March 10, 2011

Passport Holders (PH) Part II

********Continuation from previous Part I********

After buzzing and spinning my head to be more creative, and finding more inspiration for improvement, I decided to let nature plays its role.
Yes, improvise through experience.
To gain more experience, we have to do, or imagining the whole process over and over again.
Then the new idea will ***bling in seconds, or next day, next week, or worse; never!

But repetitious tasks were not my interest, nor copying from other's whole idea.
I prefer to modify the task, or come out with something new.
And its so unbelievable that achieving it was so easy given I was not born in the same group as Albert Einstein, or, Marie Curie, etc, etc.
Yes, you don't need to have a degree in Engineering, or a Noble prize recipient, or a genius to sew one.
God eased all the way. And He will always.

So I have sewed another 6 passport holders to be given away to my dearest friends who loved (and have ample opportunity to travel abroad unlike pity me), and my sister and her hubby, and my neighbour's Indonesian maid.
~Yes, all the six while the 7th has been given away to the said maid.
I deserve an overseas vacation, didn't I?

All in the hope that the holders are becoming very useful and handy to them to keep their passports in a groovy holders.

I was doing a small spring cleaning towards my purses, and bags and related stuffs when I came across two delicious bright colors Hermes leather purses organiser brought years ago.

I wonder if people can survive these shocking shades from Hermes (and not to mention also LV glaming fuchsia bag), why not to the red polka-dot, and other colorful and fancy small petite passport holders???
I had no problem, but dont know their tastes much.


~I was trying to make an 18" bias tape with this polka dots in this gorgette/polyester fabric that it wont stand the press from a heated iron.
+++Couldnt produce a seam pleat at all.
+++Lesson learnt is other than cotton or polycotton, the DIY bias tape wont work on other silky or unporust surface.


~a red bear fabric for the baby

~the clear ID window so that Immigration Officer be able to read the details


~these fabrics themed in red and black "Hanging Clothes" from fabric fanatics too


~the red and black have a plastic window made of rigid sheet


~juggling from my sewing activity, I still have to entertain the lil one who has 'played hockey' aka ponteng to school for 2 weeks in a row!

SORRY you all had to read all the long, detail, mumblings. Hey, thats what blogs are for!

Wednesday, March 9, 2011

Passport Holders (PH) Part I

With more tools available for DIY, I have started my little small humble sewing project with passport holders.

~The inspiration was from LC passport holder that I bought few years ago from Mrs June Miller.

For a dummy starter like me, my free advise is to sketch the outline from the original (in my case the black LC) over an A4 paper.
If some measurement doesnt fit enough, you may need to extend the paper using some cellophene tape.
Extend your imagination a little bit wild (?) to imagine for other inlays corners or pockets if desired. Also imagine the fold to make it like a book fold.

Then provide for some seam allowances for, maybe, 1 inch each edge.
After that, we can start to cut the fabric according to the measurement calculated from the paper plan/drawing/layout.
And sew with patience!.
Sorry I didnt attach a step-by-step instruction.

And, voila, my 1st PH was this:

~in green forest fabric made of thick cotton sourced from lovely Kelly of http://fabricfanatics.blogspot.com/

Few mistakes were made, and I admitted it.
But believe me, as time goes by, I improvised.
So the learning curve was never stopped.
For 2nd, 3rd and so on, some near-to-perfect outcomes attained.

~the inner layout

~I stitched a readymade label to it too! sourced from same as above

~the snap-on-button I install using the pliers and other tools supplied in the kit


OVERALL, I have just partly-justified all the money spend are worthy every penny, and for good cause to me, only, for the moment.


**********to be continued************

Tuesday, March 8, 2011

DIY and Sewing Tools Shopping

I managed to be to Jalan Kenanga last week to purposely hunt for some wooden kid-size hanger. Yeah, to hang the sewed peg bags.
After finally securing a decent parking space, Phhew!
Parking is a main problem for shoppers that regulars would agree with me.

After browsing two shops, only, because the lil one (yes, where else to dump that excess baggage?) kept complaining that its very hot, I finally found the target item.
Sadly, not the exact one, but a tolerable subtitute, at RM1.80 per piece.
I grab only 15 considering I am gonna be there again for more additions.

~Arghhhh, another headache for parking space hunting...


After that I zoomed to Ampang's Cottage Patch.
This time to buy some rotary cutter, button cover kits, etc atc.
And I end up buying all the dreamed wish list totalling to RM300++.
After folkart, this new extra hobby is money consuming too!

~45mm & 60mm Olfa rotary cutter, Prym eyelets plier, press fasteners, cover button kits, 1" bias tape maker

~1st product: 18mm fabric cover buttons to match with the pegs

~and since my threads are increasing, I added another level to the hanger..

Tuesday, February 22, 2011

LLB

I am trying to occupy my limited free time to do few new exploration project.
In the midst of finishing one peg bag for Nurin, this little accident happened while we were enjoying the full-chocolatey Choc Indulgence cake.

The victim, this time, on the little five years old hand, was none other than the Country Rose Corelle bread n butter plate.

I just hold, and gasped my breath, with a cash register "***blink!!!!" sound in my head.
Trying to recall how much they sold it a piece in the market, that was my lost for the day.
Positively, I shouldnt convert any lost in monetary term or, value.
One would say, but I am adjusting my sanity to not to turn to insanity on the wrongdoing and especially, the wrongdoer.

Luckily, no one were njured from the broken pieces scattered on the floor.
By the time, the cake has been fuly salvaged in our stomaches.

However, my patience was again been challenged when this happen :


~YES, my chinas cabinets has been trepassed by the plastic 'masak-masak' toys belong to whoelse...
So, to still be in control I am trying to have another project to be LLB , 'Look Like Busy' as my husband would like to refer to when he saw anyone is bustling around or juggling to do some work done....

Monday, February 14, 2011

How Much Does This Cost?

Few days ago out of the blue when deciding of the lunch menu, suddenly it crossed my mind to cook the gulai lemak ikan masin.

Noticing that my fresh food supplies were running out made me rush to the nearby supermarket, the G at BA. (gee, goods at this G are more pricey than the other Gs)

Yes, this entry is specially post to share with viewers, that I found myself shocked but no choice of looking at the tag of 1 (one) piece of daun kunyit (is it called as turmeric leaf?).

It carry a shocking tag of MYR 0.89...

~due to a bit vague image, pls zoom it if you cant see it clearly

Yeap, yea, some of you who know me may be puzzled.

Gosh, lately the main commodity ie petrol price per litre has risen from MYR2.15 to 2.30.
In the same month again to 2.40 then till now 2.50....and all other things follow voluntarily.
For a non-price sensitive inelastic demanded goods like petrol, we consumers left with no choice except for only pay at whatever price, even at MYR10/litre we still WILL PAY...or, have to....

Gosh again, my economics vocabs are rusting like a worn out enamel...

Salute 1Malaysia!!!! WE Pledge Our Loyalty to Our Country!!!

P/s: This message DOES NOT contain any political elements at all

Sunday, February 13, 2011

DIY-Peg Bags

My bought peg bags are too precious to be used as a peg bag.
Ideally the bag should then be outside purposely to store laundry pegs, but I am worried that the harsh weather will make it dull, so such a waste.

Its been lingering in my mine besides the thread and cushions plots, and wanting to produce one on my own.
(wonder what else are my plots ?)

So I decided to trace and cut from the existing LA, reminding myself of how pricey there are.
Not to mention and be compared to the Portmeirion which are far more pricey.
Originally aiming to have a jumbo size to occupy the lil one school books, which is :

~I am suffering of big headache and tantrum temper of having a lil mess-maker in the house

~hopefully some of the books will be stored in this supersize peg bag


And I also made another extra 5 bags to be given away to my nieces, yes, I had more than five, but I assumed only this figure will appreciate them.
To date since, I've been busy playing a good housewife role to a husband who had just came back from farm, I managed to finish four only.


~I only had a basic stitching sewing machine so the lettering were stiched using the button hole mode

Friday, February 11, 2011

CNY Otak Otak

Last week the whole clan went back to Kerteh while daddy only stayed in the farm house for the entire duration.
We left KL on a rainy Sunday, and the three cats were comfortably clamped at the back of the jeep, with everything, from a Suzuki TS250 and other farming equipment.

Things were no different at the back of the seat, where my suitcase and Waielah's were arranged by daddy.
Being a loving father, he managed to reserve one seating space next to the piled trunks enough for the small body to lay for rest.
But, nothing compares to mummy's comfy lap seating, and the calming body heat, that the lil one still climbed to me for a nap along the journey.

On CNY holiday ie Thursday, we had a simple family gathering, with nothing but makan-makan agenda, of course!
From Monday, my brother had helped to cut me some fresh coconut leaves from my dad's front yard where I recut into a proper measurement to pack some otak-otak.

As per my sister's expert request, the leaves are supposed to be aired for 3 days, so that it will be gently soft on the packing day to avoid any breakage or leak.
And also some string from the leaves balances were cut with sharp end to clip the two leaves together in approximately 6cm each.
Yes, the tree was proven to be a real multi-use, not to mention the coconut milk and grated young coconut grated were the main ingredients for the otak-otak's fishes marinate spice.

Since my sister promised that all the marinate ingredient will be prepared in her house and had it brought to my dad's house, so I had no chance to actually jot down the recipe.
I only experienced the process once with my sister long time ago, when I am not quite a serious to learn, and countless times with my beloved late Mom.

The day came and my other sister brought 4 kilos of three variant fishes, and the otak-otak were barbecued inside the kitchen.
And yes, my dad is still a traditional guy who had one cooking space for us to use traditional method of cooking, like this time charboil; by using some woods, char, dried coconut shell (again),etc, etc.
~mmmm, for those who had tasted this Terengganu's (not the other Johor's Tg Gelang style), the experience is....unexplainable

~somehow, the burning fire was in pink when caught by camera...

After digging on the otak-otak, we went off to Kg Chabang for a distant family's grand wedding (by the local standard) and had a sumptous wedding's gulai (two thumbs up), so yumm...

And to the nearby daddy's farm to send away some for him and the crews to feast on.
Then to MMall to shop some gift for my brother's House Warming (another makan2?)aka Kenduri Doa Selamat tomorrow.

I am filled, how many kilos gained this time?

Saturday, January 29, 2011

Where Can I Get This On This Earth?

I am trying to do some folk art plaque for my hubby's farm.
The idea has been mapped in my mind.
Even though the drawing and painting parts havent been commissioned, I am very, very worried where to source the metal scrapbooking label holder, or called bookplates, or its any other equivalent terms that I didbt come accross.

My soon to be key holder will have a bit painting, on a mmmmm, MDF board.
Some hooks will be nailed on to act as hangers.
Above the hangers, each will have a label of which key refers to which.
And I am planning to label it by way of this hard to find label holders.
All the images I can get from wonderful internet search engine.

None local sources, only found a China manufacturer with a minimum order requirement of 10, 000 units (what I am gonna do with these bulk????) at the cost of USD330 exclude of shipping.
Yeap, yeap I may consider to buy the bulk and sell via the net with the power of internet networking but I had only limited friends.
But its the last resort.

Some local online crafts blogs also offer it, but with preorder from US.
And one eBay seller from Singapore.
I had not many choices, most of them are pricey.

ANYONE CAN HELP, PLEASE????
Please, just shout me at ShoutBox (not my ears, please), and I will try to get back to you very soon.
Cause I am going back to the farm tomorrow.


Some may say, " who says art and craft are free, they are pricey", but I am still want to realise a free, cheap or affordable piece of art.

Yes, art is subjective, but it should not be manipulated by some for their own benefits on the cost of others.

Yes, economists may not agree ; there is no free meal in the world, opportunity costs, cost and worth exist, etc etc.
Thanks readers, chiaoooo...........wish me a safe journey tomorrow.

My Room My Circus


Thursday, January 27, 2011

DIY-Thread Hanger/Organiser

Yeah, yeah, it sounds like I am a very organised and fussy person.
No, I am not really, but you can imagine the fuss of finding the right thread shade to match your fabric.

If the supply stores are only next to my house, I would prefer to just dash off to there get whatever shade I want, but that is not the case.
Even though I will end up with zillion of same shades...my imagination is wild now, so sorry.

When your threads are getting let say more than 10 in numbers, and it double because you also have bobbins of the same shade, you probably would consider an organised way to store them.
As for me, the clear divided box is a choice.

But given I had only one box to occupy some other supplies other than the threads, I wish I could have something like this :

~ Lets have this in my wish list while I am finding a blacksmith that can fabricate one for me..

Part I : Original Hanger

So, I decided to give it a try to do one using wood.
These are all the tools needed :

~from left to right : Philip screwdriver (to substitute a driller), flat file, hammer, mini hacksaw, bamboo chop sticks, and a ready made wood from Daiso in the background. Not in pic: nails, picture clinchers and its nails fit to wood size for hanging purposes.

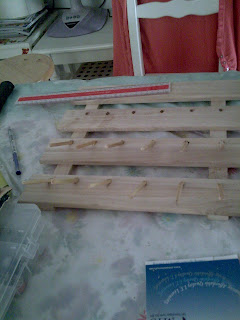
The steps :
1. Start with measuring the gap of each thread when placed upon the bamboo stick that act as a hanger. Marked it, you may have few variants considered you had 240m or 1000m threads.

2. Nailed a pair of picture clinchers with a nail that comes with the package to hang the organiser once completed. You may also omit this step if you just use a pair of double clip instead.

3. Measure and mark the chop stick using a mini hacksaw according to your number of thread holes. Exclude the hole for bobbins in which 18x3/4" or 1.2mmx19mm nails will substitute.
Smoothen the cut stick with the falt file for the outside and sharpen for the inside.

4. Using driller, or in my case a screw driver, drill holes to hold bamboo sticks. I just use a srewdriver because the wood is very soft.

5. Hammer the cut sticks to the holes. Strengthen with some nails. One nail to each stick only.
(My stick has cracked because its too thin to allow for the same nail use in (5).

6. For the bobbin row, maybe on the last row of wood, just hammer the nail in (2) with proper gap for each bobbin size.

7. Hang the wood to your desired wall, or back of the closet door like I did.
You may start to hang the threads to the sticks and bobbins to the nails.

~As in (3), prepare the cut sticks not to be too sharp for safety using file. But it has to be sharpened to be hammered to the drilled hole.

~ a WIP

~A completed hanger, but I am not satisfied. Noticed the crack on the wood...

~after all the threads and bobbins have occupied the hanger

Part II : Modification to a New Hanger

So I made the other one replacing the chopsticks with single pin hooks that usually used to hang a pencil pleat curtain.
Remember to straighthen the curvy end of the pin using pliers.
The sharp side of the pin is already a great advantage that saves time and energy, so just hammer it to the wood.

~and at the end it look like this...better!


~I also extend some rollers to act as ribbons dispensers


~and my small closet is getting jamned with fabric hanger, thread hanger, and fabrics, and other tools.